
Troubleshooting
Leak Check Procedure
There may be instances when a leak is detected at a port with a plug installed and it becomes necessary to determine the cause of the leak in order to eliminate it. The troubleshooting checklist below for leak cause and elimination is designed for applications with a Zero-Leak Gold Plug installed.
Note Before Starting Troubleshooting: The Leak Check Procedure may be continued once it has been determined that a ZLGP is in the port. Proceed through each step listed in ascending order below until a determination of the cause and remedy of the leak are made. Corrective action can be initiated at that time.
No corrective action or preventive action can be taken until the root cause is identified.
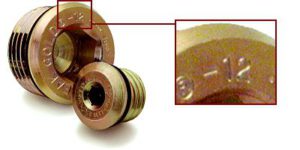
1. Determine the specific type of plug that is installed.
What does it say on the top of the plug? All ZLGP will be engraved with the name “Zero-Leak Gold” for positive identification as well as engraved with the size of the plug. A “-12″ mark denotes a SAE -12 (1-1/16” – 12) compatible plug and a “16 X 1.5” mark ZLGP denotes a metric 12MM compatible plug. A complete list of ZLGP SAE and Metric plug sizes may be found on this page under Specifications.
2. Was the originally supplied ZLGP O-ring replaced at any time with a larger size SAE or Metric plug O-ring?
ZLGP O-rings are smaller in size and cross-sectional area than their SAE and Metric O-ring boss plug counterparts. The SAE and Metric plug O-ring cross-sectional area is greater than the cross-sectional area of the recess under the head of the ZLGP and therefore will not allow for the ZLGP metal-to-metal seal to engage properly. When the larger SAE O-ring is installed on a ZLGP it is subject to extrusion when pressure is applied to the system. The correct sizes for ZLGP O-rings are listed in Specifications (last column on the right under the part drawings). It will be necessary to replace the larger O-ring with the correct ZLGP O-ring.
3. Confirm that the ZLGP was installed to the designated torque value.
A suggested starting point for the final determination of the torque value for individual application may be found at Torque Values. The installation torques shown are as a result of the testing completed by the Fluid Power Institute located at the Milwaukee School of Engineering. Should a failure occur at the suggested torque value, shut down, clean port and plug, and increase torque value by 5%. Repeat the process until a successful torque value is established for the particular application.
4. Is a calibrated torque wrench used to install the ZLGP?
Confirm calibration status of the torque wrench.
5. Are there any nicks or other visible damage to the taper surfaces of either the ZLGP or the port that could cause a leak path by preventing the metal-to-metal seals to engage?
Replace any components that have flawed, tapered sealing surfaces.
6. Is there any interference with the ZLGP seating completely in the port that would prevent the tapers on the ZLGP and in the port from engaging?
7. Confirm that the port configuration is concentric (taper to thread) and conforms to either SAE J 1926 or the metric port standard ISO 6149 and an out of round port does not exist.
An out of round condition in port configuration may prevent a metal-to-metal seal from being formed. It may also provide a leak path through which the O-ring may be extruded.
8. Was the port produced with a one piece form tool?
Are all port tool dimensions within their tolerances? See #7 above.
9. Was the port produced in a multi-step and multiple tool process?
See #7 above.
10. Are the tapers of the ZLGP and the port the same for mating components?
-02 thru -06 must be 12 degrees and -08 and larger 15 degrees.
11. Are other SAE or Metric configured plugs experiencing leaks at the same size port?
12. Are there other ZLGP of the same size installed in the same system? Are those ports leaking?
a. If some ports are not leaking, exchange the plugs in the ports – those ports where leaks are observed with those where leaks are not observed. Wipe away all fluid from all ZLGP and ports prior to making the changes.
b. Pressurize the system and apply the same conditions under which the leaks were initially reported and observe the results. Does the same port leak or does the previously leak free port leak with the ZLGP from the reported leaking port? If the original leaking port continues to leak and the port that received the ZLGP from the leaking port does not, the cause of the problem is focused on the port.
13. Observe the source of the leak. Is the fluid coming from one area or is it uniform around the circumference of the port?
a. If the source of the leak is in one location, scribe the location of the leak on the head of the ZLGP and on to the port.
b. Wipe away all fluid from the port and ZLGP and exchange the ZLGP in the leaking port(s) with a ZLGP from a non-leaking port, pressurize the system and observe the results.
14. If the root cause of the leak has not been identified after completing all 13 steps of the above checklist, contact an EPCO Applications Consultant for additional assistance or clarification:
Contact ZLG Application Consultant